Mithrelle boss fight is split into 3 phases. Phase 1 happens only once while Phase 2 and 3 keep repeating until she is dead. Phase 2 is where Mithrelle damages you and Phase 3 is where you get to damage her back. Read on.
Phase 1
 |
| Picture 1 - Phase 1 |
Tactics
The sneaks are pretty easy and if you are battling no more than 3 I suggest Frenzy Stance since you want to bring them down faster. If you get 6 or more sneaks around you I recommend putting Defensive Stance up.
You can avoid battling all the sneaks by destroying the nests in the ground (see picture 1). Ignore the first nest since the snakes from that already spawned. After that try to destroy the nests as fast as possible. There seemed to be a spawn order but since I could not redo the fight I am not positive of what it is. A couple Flashing Arcs are enough to bring a nest down so you should have no problems.
Once all the sneaks are dead Phase 2 starts.
Phase 2
This phase starts with a big snake (Solo-Boss difficulty) spawning and Mithrelle teleporting to the middle of the room. Mithrelle casts Shivering Blast which is frost damage and hits for a decent amount. When I had Guardian Stance up it would hit me for 214 frost damage. The Big Snake is not hard and hits for very little in comparison. While Mithrelle is casting Shivering Blast you will be unable to harm her. Your hits will do more than 5-10 damage each time.
Tactics
Put Guardian Stance up to mitigate Mithrelle's damage. Do not hit the big snake and I seriously recommend kiting them and going out of Line of Sight (LoS) of Mithrelle to avoid her damage. This phase lasts at least 15 seconds so you got plenty of time to kite.
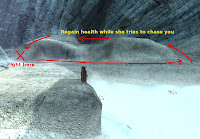
Also very important is to try to position Mithrelle close to a rock and, when you do, go attack her and have your back to a wall. See Picture 2 for a good location to kite and position her (X spot). I actually just kited her once just so I could regain some health. Once I got her in that corner marked with the X (see Picture 2) I just stayed there and ate her spells.
Phase 3
 |
| Picture 2 - Mithrelle Phase 2 and 3 |
If the Big Snake is still alive, Mithrelle will lose control of it and the snake starts attacking Mithrelle (and actually does some pretty good damage). This also means that when Mithrelle is no longer stunned she will first need to regain control of the snake by casting a spell. Only after casting that spell will she cast Mithrelle's Illusiveness. This is why you should not kill the big snake first.
Tactics
Once she starts casting Grip of the Witch remember to put Frenzy Stance since she and the snake will no longer be damaging you and you need the damage burst. Once she starts casting Mithrelle's Illusiveness go back to Guardian Stance.Make sure you trap Mithrelle in a corner with a wall close by so you don't get pushed back when she casts Grip of the Witch. This saves you precious time and is the difference between hitting her with an extra Flashing Arc. If you do this plus keep the Big Snake alive you will gain enough time to hit her with 2 extra combos.
In the end a weird thing happened. Her loot was actually a destroyable box named "Mithrelle [Boss]" which after killing turned into the actual loot.
That's it! Hope this helped anyone having problems.
No comments:
Post a Comment